Running a CRON job in Next.js with Queuebase
Disclaimer: I built Queuebase. You can read more about how it was built and the public launch of announcement.
In a typical web framework, like .NET, Rails, or Node, there are a few ways you can schedule a job to run at a specific time. In .NET you have Hangfire and Quartz, Rails gives you Sidekiq, and BullMQ is a great option for Node. In frameworks like Next.js however, solutions like these don’t exist.
Next, and other frameworks like it, do not support long-running processes. They are typically deployed serverless platforms like Vercel or environments where requests are short-lived. This makes it difficult to run/schedule jobs.
To solve this problem, I built Queuebase. And today, we’re going to look at how you can use it with Next.js to run a CRON job.
What is Queuebase?
Queuebase is a serverless job queue for Next.js applications. It provides a simple, yet powerful SDK for creating jobs in your code base. It also lets you define CRON jobs right from the dashboard.
Prerequisites
We’re going to be using Next.js with the app router for this project. You will also need:
- A Queuebase account
- Ngrok or Localtunnel for local development
And that’s it!
Setting up Queuebase
First, in the Queuebase dashboard, create a new app. Make sure that the URL is the URL from your local development environment. Once you have an app created, we need to get our API and signing keys and add them to our .env file.
# .env
NEXT_PUBLIC_QUEUEBASE_API_KEY=YOUR-API-KEY
QUEUEBASE_SECRET_KEY=YOUR-SECRET-KEY
Next, go ahead and install the Queuebase SDK in your Next.js project.
npm i queuebaseWith that installed, we can go ahead and setup out job router.
// api/queuebase/core.ts

import { type JobRouter as QueuebaseJobRouter } from "queuebase/lib/types";
import { createQueuebase } from "queuebase/next";
import { z } from "zod";

export const jobRouter = {
  myCronJob: j().handler(() => {
    console.log("This job is run on a schedule!");
  }),
} satisfies QueuebaseJobRouter;

export type JobRouter = typeof jobRouter;
Then, we can create the job handler.
// api/queuebase/route.ts

import { createAppRouteHandler } from "queuebase/next";
import { jobRouter } from "./core";

export const { GET, POST } = createAppRouteHandler({
  router: jobRouter,
});
Optional: Creating a job client
The Queuebase job client is how you interact with your jobs from your codebase. It allows you to trigger jobs from both the client and the server. In our case, because this job will run on a schedule, we technically don’t need to create a job client. It can, however, be useful for local testing to make sure it works without having to create a schedule.
// utils/queuebase.ts

import type { JobRouter } from "@/app/api/queuebase/core";
import { createQueuebaseClient } from "queuebase/client";

export const { jobs } = createQueuebaseClient<JobRouter>({
  apiKey: process.env.NEXT_PUBLIC_QUEUEBASE_API_KEY!,
});
Creating a CRON schedule
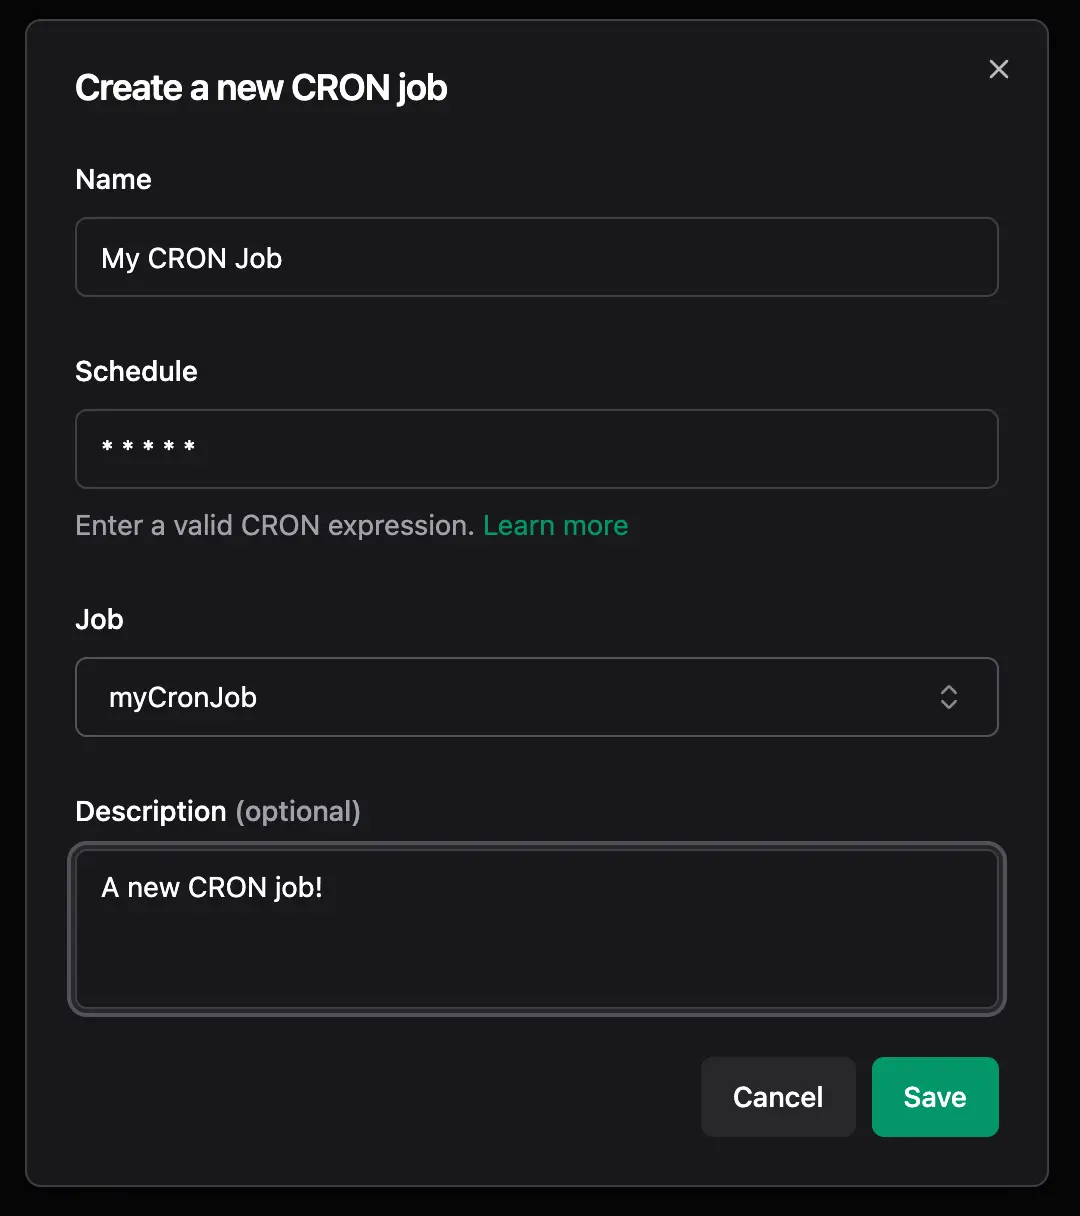
Now that we have our job router and job client, we can create a CRON schedule. Head back into the Queuebase dashboard and navigate to the CRON page. Click the ‘Create CRON job’ button. You’ll be presented with a form to create a new CRON job.

You can give it whatever name and schedule you want. What’s important is the Job you select. Queuebase will give you an option to select a job that’s been synced with Queuebase (learn more about syncing jobs). You are also presented an option to create a new job, should the one you want not be synced. You need to make sure that the name you give the job matches the name of the job you created in your codebase.
Once you hit save, you should see you new job appear in the listing!
Bonus: Testing your job
To test your job, you can use the job client from earlier and trigger it manually. This is a great (and recommended) way to test your job locally before deploying it to production.
You can also still create the schedule in the dashboard, but disable it once you’re done testing. I do not recommend leaving a CORN job active in local development environments. This is because when you stop your local server, the schedule will still be active and try to run the job. While these jobs will fail until the sever comes back on, the runs will still count your daily/monthly usage.